BY BRIAN J. WARD
The fire behavior training “dollhouse” has been out for a few years now and has been a beneficial firefighter training tool. Training instructors can use it to simulate the various phases of fire for new firefighters. Originally, the dollhouse was designed to simulate a multistory residential house. I wanted to modify it to represent a strip shopping center or industrial setting.
Redesign Considerations
In redesigning this prop, I considered the commercial and industrial building construction factors, including renovations, construction modification, and natural ventilation paths within a structure. Inside the prop body, I incorporated multiple chambers with opposing openings in each chamber. On the back side of the prop, I incorporated sliding doors to control the flow path into each chamber of the structure. On the front of the prop, I incorporated the normal front door where the fuel package sits.
The ability to see what is happening in each chamber while observing the prop’s inlet and outlet is also a key design element. As I’ll show later, adding acrylic windows (Plexiglas®, available at most home improvement stores) allows an excellent view of a backdraft traveling through a structure. Using standard off-the-shelf Plexiglas® will allow you to see the moisture being drawn out of the wood during the initial stages, laminar flowing, turbulent smoke patterns, and then the actual fire being drawn through the structure. The Plexiglas® will last through about 30 to 45 minutes of continuous scenarios, depending on how you cool and heat the fuel package.
RELATED FIREFIGHTER TRAINING
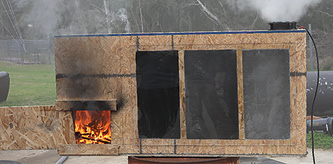
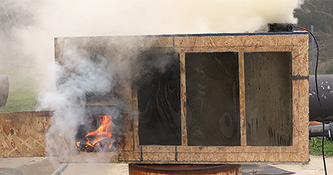
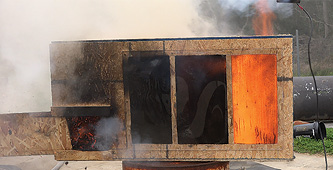
The design also includes a fan that allows for a demonstration of positive and negative pressure ventilation, such as that ceiling exhaust fans and the heating, ventilation, and air-conditioning (HVAC) units typically found in industrial and commercial settings would provide. This fan is also valuable for discussing residential tactics during wind-driven events and during the use of mechanical ventilation. To simulate these conditions, I used a computer fan and a four- × four-inch box fan and attached a standard electrical plug for power. Photo 1 shows the front of the prop; photo 2 shows the back.
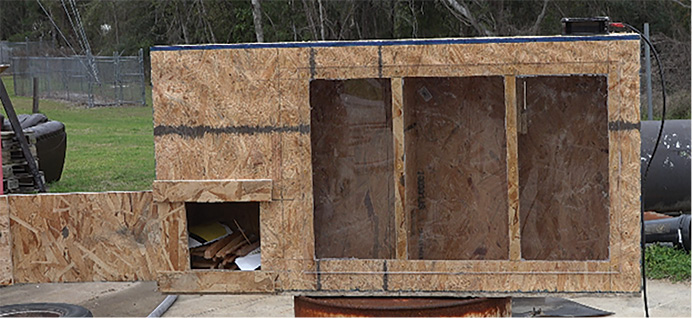
(1) Photos by author.
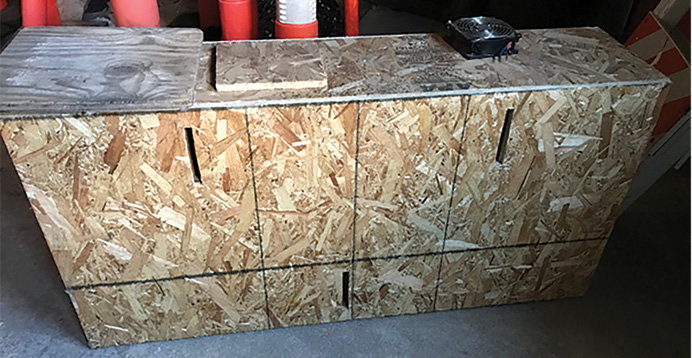
(2)
Specifications
- Height, depth, length: 24” × 12” × 48”.
- Fuel package opening: 8” × 8”, approximately 2” from the bottom and centered in first chamber.
- Between each chamber is a 4” × 4” hole cut into the partition. A sliding insert, operated from the rear of the prop, allows the opening and closing of this hole.
- Vent hole on top, far right: 4” × 4”.
- Front panel cutouts, covered with Plexiglas®: 8” × 18”.
- Back cutouts, ½” × 4”, allow the movement of the inserts used to open and close 4” × 4” openings in the chamber partitions.
- Inserts must be long enough to provide an external handle and to cover the 4” × 4” partition cutouts.
- Front door: 15” × 10”.
- Plexiglas®: 31” × 21” to cover the three open chambers.
Materials
- One 4’ × 8’ × ½” oriented strand board (OSB) sheet.
- One tube of caulk.
- Nails/staples for assembling wood.
- Screws to attach Plexiglas®.
- Circular and jig saws to cut wood holes.
Training Setup
The training activity is based on 30- to 45-minute scenarios. I describe the process of what I will show students and what they will see before I ignite the fuel package. This cuts down on how much you have to say while they are observing the fire behavior.
First, I cover the fuel package, kindling or fat lighter, which is used in southern states. Fat lighter is the hardened, resin-impregnated heartwood of a pine tree. It ignites easily and produces excellent fire behavior characteristics. It can be purchased or cut into pieces but should be approximately six inches long and ½-inch × ½-inch width and thickness. The sticks are placed in a log cabin-style cross pattern about six inches high.
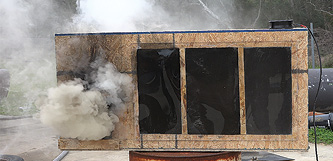
All openings in the partitions are controlled by sliding inserts moved back and forth through the ½” × 4” slots as seen in photo 2. The partitions are initially closed and the fan is off. Use turnout gear in case you get your hands too close to the fire or have some other issues from lack of specific training experience using this prop. When using this, I have a firefighter with water extinguisher standing by. A self-igniting, multiuse torch is the ignition tool; it’s available at a local hardware store for $30. The computer fan needs an extension cord.
Teaching Points
You can cover multiple teaching points outside of the classroom without using a slide show. I cover the phases of fire, including pyrolysis, ignition, growth, flashover, and full development. Other training items considered are smoke is fuel, backdraft, positive and negative ventilation, and ventilation-limited control. You can also cover smoke patterns, smoke color, igniting a cold fuel package vs. a hot fuel package, and how easy it is to reignite a fuel package.
Ignition. Discuss the process of pyrolosis and off-gassing of materials during the ignition phase (photo 3).
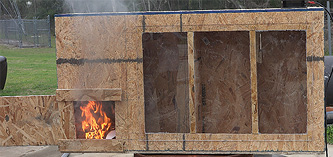
(3)
Ventilation-limited control. Discuss the process of limiting oxygen to control fire development.
Growth stage. Discuss the growth of fire; once the fire has left the fuel package and walls in between each chamber are on fire, you are seeing the flashover stage. You can also start opening the holes in the partitions with the sliding doors to show flow path and smoke patterns. The first chamber is beginning to show cold smoke and moisture begins to develop on the Plexiglas® from moisture in the wood. As smoke travels through each chamber, its velocity and turbulence slow because of its distance from the fire and its passing through the openings (photo 4).
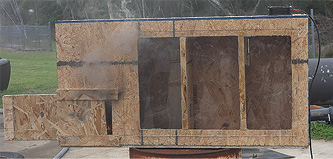
(4)
Negative pressure ventilation. Discuss the effects of a possible exhaust opening or HVAC system drawing the fire across building. In each chamber, notice the differences in the moisture content and the smoke patterns (photo 5).
(5)
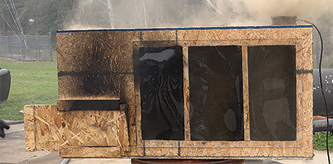
Positive pressure ventilation. Notice that the fan is now introducing air into the structure and toward the seat of the fire. The picture is showing the situation two to three seconds after removing the front door. Important discussion points include smoke color and velocity and the location of the firefighter in relation to the door after opening. Firefighters should stand to the side of a door when opening it so they are not in the flow path and do not get caught in the products of combustion extending out toward them (photo 6).
(6)
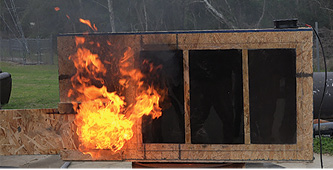
Seconds after the situation shown in photo 6, the smoke touched an ignition source (photo 7).
(7)
Backdraft and smoke is fuel. Photos 8-10 were taken approximately three seconds apart. The door was originally shut, placing the fire in a ventilation-limited state (photo 8). The door was removed; oxygen was thereby introduced; and, at the three-second mark, the preheated fuel package in the front door ignited (photo 9). The third picture occurred one second after the initial backdraft in photo 9. There is no fuel package in the third chamber; it is only filled with smoke. This ignition of the smoke was powerful enough to propel the computer fan approximately one foot above the box and caused a partial separation of the back wood panel (photo 10). For a small level box scenario with only a handful of fuel, it was a violent event. A lesson learned to prevent massive failure of the box: Cut a pressure relief hole in the second chamber by laying a piece of OSB over the 4” × 4” hole.
(8)
(9)
(10)
Training is vital to helping all of us learn. Experimenting with how we can create live training scenarios not only keeps the students’ attention, but it also provides memorable training where they can see, feel, and hear the experience. It can also help us create events that are applicable to what we will face on the streets—e.g. the exhaust fan in a ceiling or the positive pressure effect of a HVAC system. We were able to demonstrate the effects of compartmentalization on the fire and the multipoint ignitions inside the structure chambers apart from each other, further reinforcing the importance of the firefighter path of travel and ventilation.
BRIAN J. WARD is the global safety and health emergency preparedness and response leader for Georgia-Pacific. He is the author of Training Officer’s Desk Reference, an International Society of Fire Service Instructors member, Georgia Smoke Diver #741, and an FDIC International instructor.


